Friday, 21 October 2011

Creating the Back of the Head


At the moment, this is what I have, I have applied the symmetry modifier for the left hand side of my face to make it complete.


I have also applied turbosmooth to the face to make it look more appealing.


The next task is to create the back of the head.
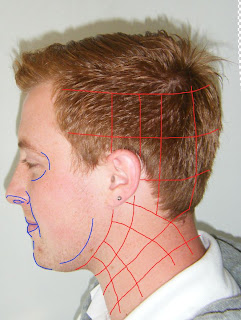
I went back onto Photoshop and I have mapped out the topology for the side and back of my head. Now to make the rest of the head.
To do this, I have used a sphere and matched that to the size of my head. This is to make the head shape more even. I have also cut it in half and taken out lots of the polys as I do not need a complete circle for my head, I will be needing to create the neck shortly.

After this, I created and pulled the edges on the inside to the right hand side to make the side of my head. This was relatively easy to complete and I managed to do this in no time at all.



Editing the Lips

The lips on my face haven't come out extraordinarily well, this is because I haven't really understood how to make them look more realistic. This can be improved upon though. I believe they look ok, but not fantastic for a final product, they need a little tweaking and this will be improved.

All I did to create the lips was selecting the outline of the mouth and I created an extra row of poly's for each the top and bottom lip. I then moved them into position, I just simply moved them down and slightly in, towards the inside of the mouth. this makes the face look like there is something there, but the lips aren't as defined as I would like them to be. This is also something that will be worked upon with a little more time. What I aim to do is define the lips and make them a little bigger and give them a better shape.


Modifying the nose

The challenge of the nose was a time consuming one, I had a lot of difficulty in creating the nostrils to make up the nose. This was the hardest part so far that I found, after selecting the edges around the gap in the nose, creating new sections was fine, but when it came to the modifying of the nostrils, I just could not get the shape right, I ended up with very strange shaped nostrils. But once I had a lot of manouvering around and pulling vertecies this way and then the other, I eventually created a nose I was proud of.

Final Nostrils

Nostrils with TurboSmooth on

Creating the face...

Once the reference planes were in position, the next task was to get to work on creating the polygons individually. I did this by putting on the snap tool, and then created the polygons using the topology on the reference planes as a guideline. This was relatively simple, but the challenge was to not create any triangles. This was the biggest challenge around my nose, but I managed to work around this and create a fairly managable set of polygons. Once all were created, all the vertexes were all relatively close to each other and they needed to be welded at this point, but before I could weld them, I needed to select one poly and convert it to an editable poly (this is to create a surface) and attach all the other polygons to the first one, the task then was to simply select all the vertecies and then use the weld tool to connect them to their nearest vertex. This then created a complete surface to start working on to model into the shape of my face.

Once this was completed, I needed to use the left had viewing panel and I simply pulled the vertecies into position and put them into the places I felt they needed to be to create the correct shape of my head. As I was putting the vertecies into place, the face was beginning to take shape, I made sure that I tried my best to keep the vertecies in a similar position as they were in the other image, but some of them just looked out of place, so I positioned them as I thought better.

Once completed I have half a face, this is my progress...


Friday, 14 October 2011

Starting Out.

First of all, we needed to map out the contours of our faces, I found this quite difficult as I have high cheekbones, but could not really point them out as I wasn't smiling in the images.

Using photoshop to draw out the contour lines of the face and usaing the rulers was a real help and wasn't really that difficult at all. 


Once I had the basic lines finished, the next task was to complete the topology, though the video was very helpful, the man in the video has a very different face, so trying to complete it as well as he did was a challenge. The biggest challenge I encountered was making sure that there were no triangles and making sure that every poly had four vertexes and lines. Also, making sure the lines flowed together and went in the right directions was a little tricky, but eventually I managed to get going and complete the topology in a reasonably quick time!


Now the two images of my face were lined up, and the topology on the front of my face was completed, it was time to get the image loaded up into 3DS Max and onto a refence plane.